Tuesday, April 8, 2014

72 Hour Kit Printable


One of my close friends asked me if I would help her get a plan in order to get her family prepared. We decided that the best place to start would be a 72 hour kit. I posted earlier about what I have in my 72 hour kit, and I thought it might be helpful for you to have a print out that you can have with you. Basically, it is a big 72 Hour Kit Scavenger Hunt! Hahah! All you have to do is print out the list found HERE, and check off the items as you obtain them! Ready....set....go! Happy hunting! :)

Also, you can now find Prepping With NatSprat on facebook!
 

Friday, February 8, 2013

Tackle Box First Aid Kit

Lately I have been on a medical emergency preparedness kick. I'm not sure why, but it's been on my mind a lot. I've been wanting some sort of a medical kit that I can take with me wherever I go, whether it's a weekend camping trip, a cross country drive, or something happens and we have to bug out. How would I be able to take the medical supplies and things I might need with me on the go? Well, I came up with a solution that I am pretty stoked about. I would like to introduce you to my new baby!!!


It took me WEEKS to put this together. And she's a beauty. I am thrilled and madly in love. :)

Would you believe that that is really just a tackle box that I found at Walmart? It was PERFECT.  How would you like a grand tour? Let's start at the top.


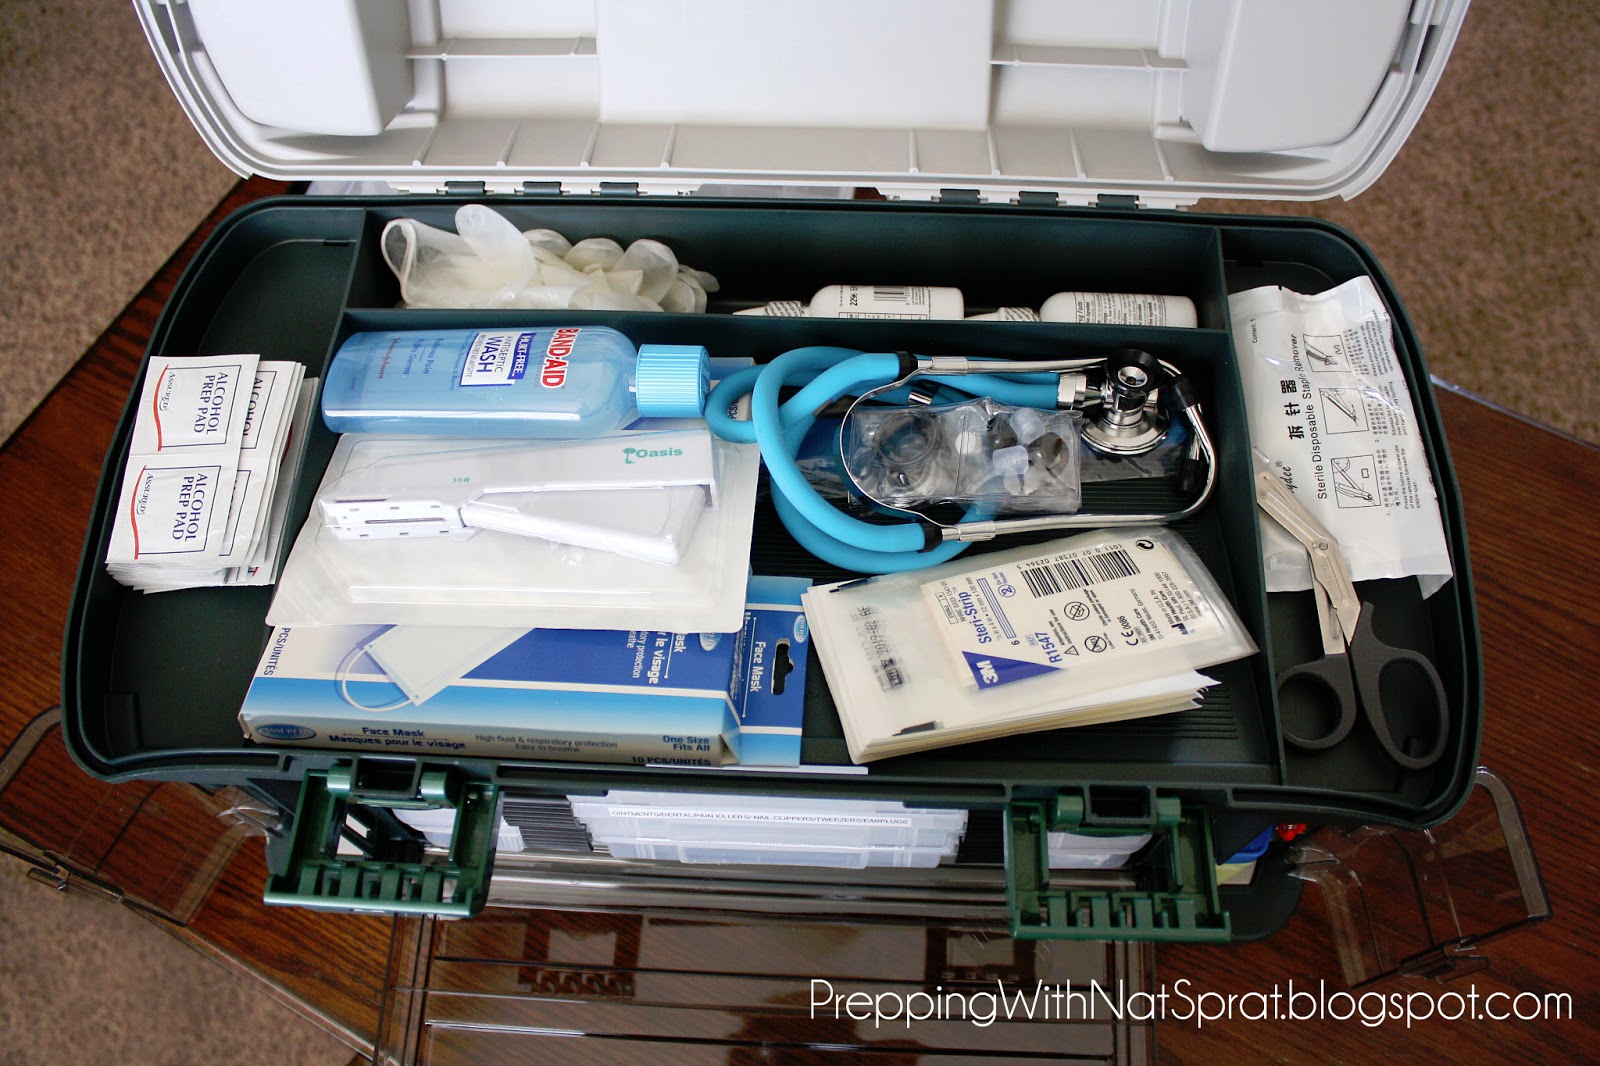
The first thing you'll see is antiseptic quick clean hand wipes so I can wash my hands first. Then there is some saline...I'll explain that later. Then, on the right you will see a bunch of latex-free gloves. Who knows what I'll be touching. Two words...universal precautions. (I would stock up on a ton of these....)


The top has a nice big storage compartment. I have some medical masks, more gloves, alcohol swabs, stethoscope, blood pressure cuff, antiseptic wash, more saline, paramedic/utility shears, Tegaderm, and some Steristrips and other things for wounds that would require stitches.


Now...I would hope that it would never come down to this. Things like this should never be done unless by a doctor or someone trained to do it. However...there is the but.  And it's a big but. But, what if you are in the middle of nowhere or a doctor is not an option? You can find lots of information out there on how to use these. It's not medical school, but you can learn how to get the job done when there is no other option. Better safe than sorry. First, I have some super glue. It's great for minor flesh wounds. They used it on Aaron's forehead when he split it open a few years ago. Then, I bought some steri-strips. These are perfect for closing the edges of small wounds to help the skin to heal. If steri-strips won't cut it, there is a skin stapler. I had thought about getting the supplies to do sutures, and even learned how to do them right. But, the more I thought about it, the more I thought a skin stapler would be better. It would be MUCH faster than trying to have someone sit still with no pain management medication, and staples would be much more uniform and would help to prevent uneven healing. Also, you can practice on a whole chicken before you cook it for dinner. Give it a nice slice, and fix it back up. Once again...I hope that I never have to use these in real life, but can sleep peacefully knowing that I have them with me and that I know how to use them.


The tackle box has 3 big removable drawers and two big side compartments for big things like medicines.


 The first drawer has band-aids, bandages, gauze, first aid ointment, Quikclot, etc. I loved that the drawers came with little dividers. That way you can fit it to whatever you put in it! I have different kinds and sizes of band-aids (yes, I have fun kid ones, too. Just because they get a scratch doesn't mean it can't be cute!) I also bought some of those latex finger protectors...just in case. They are great if I'm out in the woods and I have a wound with a band-aid on it I don't want to get it all muddy or something where it can get infected. OH! And MAXI PADS. Yes...maxi pads. They are fabulous for heavy bleeding. Nuff said. Also, you will notice that I have some saline in there. 

How about a little quick thing on that. Saline is AWESOME for rinsing debris out of wounds. Alcohol and hydrogen peroxide will actually HARM the tissue and delay healing. While dirt and grit will irritate the wound, they also carry a much greater risk of infection from the bacteria that they contain. For any newly formed wound, it is important to clean it out to remove the dirt and bacteria. It is also important to keep the wound clean while it is healing. Bacteria that gets into the wounds will cause inflammation and swelling. This will slow the healing process and will also lead to scar tissue, and the wound won't heal very well. The other thing that saline solution does is help moisturize the wound. If a cut or other type of wound is too dry, it won't heal properly. So, you can also spray the saline on gauze to keep a wound from drying out and keep the bandages from sticking to the wound. It doesn't sting, it doesn't kill the skin cells that are trying to heal, and it is just enough pressure to get a good squirt going to rinse out the junk. Plus it is easy to find and inexpensive. Good stuff.

Drawer 2 has your everyday ailment kind of things.

I have aloe gel for sunburns
sunscreen stick
 A&D cream
 hydrocortisone cream
hemorrhoid cream (did you know you can treat cold sores with it, too?)
 Vagisil (Ladies, if you are out in the woods for a while with no way to bathe, this is nice to have around if your ph balance gets thrown off)
 Dentek kit (to repair broken fillings and crowns)
 Orajel numbing cream
 eye drops
Chapstick (I would be MISERABLE without it)
 tongue depressors
 tweezers
 numbing throat lozenges
 heavy duty hand cream
 pregnancy tests (hey...you never know....)
earplugs (sometimes you just need some peace and quiet.)
Q-tips
nail clippers
ibuprofen and acetaminophen
allergy medicine
burn cream
Calamine cream


 The third drawer has things for sprains, strains, bumps & bruises. ;) There is a wrist support, an ankle support, and a knee support. Some ace bandages, instant cold pack, medical tape, self-adherent bandage, and finger braces. 

In the large side compartments I have different medicines. One side for kids medicine, and one side for adult medicine. 


Just your basic stuff...
Pepto-Bismol chewable tabs (they take up a lot less space than a big bottle of the liquid)
children's acetaminophen
children's allergy medicine
children's cough/cold medicine
antacids
cough drops
sinus medicine
anti-diarrhea medicine
laxatives
nausea chewable pills

It is also important to always have some extras of your prescription medications on hand. My daughter has asthma. If she doesn't have her inhaler she will die.  Most of the time, if you talk to your family doctor about it and tell them you are trying to put together an emergency 72 hour kit, they will be more than happy to give you prescriptions for extra. They will even do this for things like antibiotics. They will often do this for people who are traveling out of the country. So, talk to your doctor. You don't want to be in an emergency and not have them.

 
 Another great thing to have in your kit is a CPR breathing mask, also called a pocket mask or barrier device. If you are giving rescue breathing to a family member or something, you will probably be fine. But, if you are giving it to a stranger, you never know what kind of infectious disease they might be carrying. Or...they could vomit and get throw up in your mouth. Not cool. 

I got mine for free from a paramedic in the grocery store line! I asked him if he knew where to get them and he said he had some in his truck. So...make friends with a paramedic. On that note...please check with your local Red Cross and get CPR training! The procedure has changed to where you don't do rescue breathing anymore with CPR. It's better to save a life when you actually know how to do it.


 And that, my friends, is the end of our tour today. I hope you found some of this information helpful! I'm sure I will continue to add to this as I go along...there are so many great first aid stuff things out there.

If you have any questions about anything, please let me know! I will be happy to answer! Also, if you have any suggestions or anything that I'm missing, please throw them my way! I am always looking for improvement!

Thank you for stopping by Prepping With NatSprat! :)


Wednesday, January 30, 2013

Get Back to the Grind: Wheat Grinders

One of the most important things you need to get in your journey to emergency preparedness is a wheat grinder. Wheat is an critical part of food storage. But it won't do you much good if you can't do anything with it! Sure, you can boil it, fry it and even bake it. But personally, I'd rather have some nice homemade wheat bread with butter and honey. If you would, too, then be sure to add a wheat grinder to your shopping list!

There are lots of different kinds of wheat grinders. Some are electric, which are awesome...if you have electricity! I have the kind that hooks up to my kitchen-aid mixer. It's great! But I also wanted something for situations when there was no power available. And I am NOT going to grind my wheat with rocks out in the backyard. So, this post will be about the kinds of grinders you would need if there were no electricity. I'll include links to several different ones in different price ranges. Hopefully you can find the one that fits your budget and your needs! We'll start from least expensive to most expensive. However, remember that you may get what you pay for. You want a good quality one, who knows how long you will need to use it. However, also remember that a less expensive one is better than nothing! And if you find one, shop around the internet. I tried to find the best deals on these as I could...but who knows, you may find it at a better price somewhere else.  Find the best sale so you can use that extra money saved for other emergency preparedness things! *wink wink*


Specially designed for milling corn, grain, cereal, soybeans and nuts. Quick-grinding, hand crank mill features a clamp mount and rust-resistant, tin-plated cast-iron construction with a 5 1/2in. diameter aluminum hopper.


   $56.95 at BePrepared.com
Features:
  • Grinds exceptionally fine.
  • Cone-shaped grinding burrs are self aligning, made of cast stainless steel, and are precision machined to insure long life and smooth, even milling.
  • Grinds wheat, corn, rice, oats, barley, non-oily seeds, peppercorns, and other dry grains and spices.
  • Adjustable for any desired texture from fine to coarse.
  • Grinds about 1/2 cup of fine flour per minute or 1 cup of coarse flour per minute. You will be delighted with the results.
  • Make your own delicious whole grain breads, cracked grain cereals, and other bakery items at a fraction of the cost of store-bought.
  • Saves you money, while providing fresher, healthier foods.
  • Stores easily in a drawer or cupboard and is always handy when you need it.
  • Dimensions: 11 ½” x 5” x 2”


This is a really popular one. It's a solid little thing! (BTW, this is the one I chose for my family.)
 Wonder Mill Junior Hand  Grain and Flour Mill.
                         $219.95 at BePrepared.com

* One-piece construction means no worries about the hopper coming off during milling.
* Grinds fine flour or coarse cracked grains for cereals.
* Simply swap the stone heads for the stainless steel burr heads to make peanut butter, grind flax or any other oily or wet grains, and even grind herbs and spices, soy beans and legumes.
* Central support pillar is set back to make it easy to collect your hand-ground flour below
* Extra large lifetime lubricated bearings


I would now like to introduce you to the Jr. Mill's big brother.
The Country Living Grain Mill
  • Premium Hand Grain Mill: The Country Living Grain Mill is a high capacity hand operated mill that can easily be adapted to powered operation because its design incorporates a handle-flywheel which doubles as a v-belt pulley. Construction of the Country Living Grain Mill is strong cast metal alloy with super tough powder coat finish that won't chip or peel from anything short of severe abuse. It's a very nice mill to use and a handsome piece of equipment with clean, functional lines and beautiful raised wheat heads on the side panels.

  • Engineered for Quality Grinding: The grinding burrs for the Country Living Mill are precision-engineered, made of high carbon steel (not lower-grade iron) and are a massive 5" in diameter. Flour remains cool in the Country Living Mill, so nutrient quality is preserved. The precision fit of the burr faces also means turning effort is unusually easy for a hand operated mill, particularly with the optional handle-length extension. The Country Living Mill produces 1 cup of wheat flour in about 1-1/4 minutes (grinding rate is a little slower if you use the optional Power Bar handle extension.) The grind is infinitely adjustable, so you can crack grain at a loose setting or crank it down and get extremely fine whole grain flour in a single pass. The Country Living Grain Mill is excelled in its ability to combine moderate turning effort, yet produce very fine flour — or a coarser meal texture, depending on your needs.
  • Motor Option: A motorizing kit is available below or you can construct a motor drive of your own design. Some owners have also adapted their Country Living Mills to drive off an exercise bike. The motorizing kit uses a commercial grade gearmotor, and this option can always be added to your mill later, if you choose.
  • Built to last... and last: The Country Living Grain Mill represents the ultimate in strength and durability, and the fit and finish are outstanding. The handle is hardwood, 7" long, and shaped to fit the hand very comfortably. You'll need to fasten your Country Living Mill to a table or large board. You can bolt it down in a permanent location, or a great new Country Living Mill clamp option is now available below. The mill has double sealed industrial ball bearings that are widely spaced to prevent shaft runout and minimize wear. (You can see the shaft and bearing assembly below on this page.) Even with regular use, the Country Living Grain Mill will still be providing trouble-free service in your great-grandkids' day.
  • Easy to Clean: No hand mill is easier to clean than the Country Living Mill. Just spin the large adjustment knob on the nose of the grinder off, and the outer grinding plate slides off for total access to the grinding area of the mill. You can brush the flour off the plates and have them reassembled again in one minute.
  • Highly Versatile: The Country Living Grain Mill is, as its name implies, designed primarily for grains (and beans.) But many of our customers use their Country Living Mill to grind various other materials that are dry, flowable and not excessively oily. Even small amounts of dry herbs can be ground.
  • Dimensions: The Country Living Grain Mill stands 13.5" tall and measures 12" wide & 10" deep, excluding handle. Weight 17.7 lbs. Flywheel diameter 12-1/4". Hopper capacity is 4.5 cups.
  • Manufacturer's Lifetime Warranty in manual operation 

This one is from Williams Sonoma. 
$675
I love the red of this one....but didn't want to pay the extra $200 for it. Sigh. :)

Compared to commercially ground flours, freshly milled grains are richer in vitamins and far more flavorful. This sturdy mill makes it easy to grind your own grains—including wheat, oats and barley—as well as corn, legumes and nuts. Create flours for breads, cakes and other baked goods with rich grain flavor. You can also make your gluten-free baking mixes, fresh nut butters and granola. Use the optional clamp to attach the grain mill securely to your countertop surface for a complete workstation. Each mill and clamp is individually handcrafted in the USA to endure for generations.

  • Preserves the natural nutrition of fresh whole grains and ensures your results are free of unwanted additives and preservatives.
  • Handmade of steel with precisely machined burrs.
  • Grind can be adjusted to the desired consistency, from coarse to ultrafine.
  • Includes a large and small stainless steel auger to handle a variety of grains.
  • 5" grinding burrs are machined from hardened alloy steel.
  • Stainless-steel hopper guard.
  • Can be cranked by hand or powered by an electric motor or even a bicycle.
  • Ergonomically contoured crank handle is crafted of hickory wood.
  • Secure to work surface by bolting through the predrilled holes or using the GrainMaker clamp (sold separately).
  • The clamp’s two-point contact holds the mill securely in place even if you grind using electric power.
  • Clamp is machined from solid aluminum stock and easily attaches to countertops up to 3" thick.
  • The mill and clamp both have a durable baked-on red powder-coated finish.
  • Mill: 10 1/8" x 13 3/4" high.
  • Clamp: 3" x 5 1/2".
  • Lifetime guarantee.
  • Made in the USA.


There are lots of wheat grinder options out there, but these are the most popular ones I have found. Hopefully this helps you along your way to finding a wheat grinder for your family! If you have any questions, let me know! I am more than happy to help! 


And as always, thanks for stopping by!  

Wednesday, January 23, 2013

Ten Essential Emergency Preparedness Tips


Trying to become self reliant and prepared for whatever emergency life might throw at you can feel pretty overwhelming at times. Recently, it's become something I have become passionate about. I feel like shouting it from the rooftops! Possibly while dressed like a clown, juggling watermelons AND hula hooping at the same time to get more attention. However, my rooftop is still icy so I will post it on my blog instead. I thought I'd share with you some helpful tips I have found when it comes to food storage and emergency preparedness!


1. Make sure you store a good variety of foods. You will get tired of eating wheat, rice, oats and honey pretty fast. Be sure to include fruits and vegetables, cheeses, spices, etc. You don't want to get appetite fatigue. It can get to the point where a person would rather die than eat the same food over and over. The people most at risk are small children and the elderly. (And my kids are ALREADY picky...sigh!)
 

2. Learn to cook with your food storage foods BEFORE an emergency happens and you are under stress. Did you know that it takes about 3 months for your body to adjust physically AND psychologically to eating a different way than you normally do? Well, now you do!


3. Have a hand grinder in your storage!!! There are lots of electric ones, but they won't do you much good if there is no power. You can find them all over the place, ranging from around $50 to over $400. Remember that you may get what you pay for. If you have 600 pounds of wheat to grind you're going to want a good grinder...unless you feel like grinding it between two rocks. It will only be fun for about 30 seconds. (I may or may not have tried this approach.)


4. Cooking oil will be EXTREMELY important to have with your storage. It's a great source of fat and calories. Besides...it's close to impossible to cook without. It will also be a great bartering tool. Vegetable oil, olive oil and shortening....put them on your list.
 
5. Stock up on spices, baking ingredients and flavorings! They will also add flavor variety to what you eat. Add some taco seasoning or Worcestershire sauce to your beef TVP to make it taste a little better. Add vanilla to your powdered milk when you mix it up to make it a little more flavorful. Add a little sugar to your dehydrated veggies to improve the flavor, too. What do you use now in a lot of your recipes? Make a note of it and then buy them in bulk! Places like Sam's Club and Costco have bulk spices for cheap. Be sure to have your baking soda, baking powder, powdered eggs, cheeses (Yes, they really do sell freeze dried cheeses!)


6. Try your best to prepare balanced meals. Don't just eat a plate of beans. Be sure to include rice, wheat or corn as part of your menu. Have some vegetables or fruit on the side. 


7. Rotate your storage! The best way to do this is store what you eat and eat what you store. Remember what I said earlier about learning to cook with your food storage BEFORE things get bad? Just be sure to buy a new can every time you open one up and use it. 


8. Don't forget to store things besides food. Water, paper products, soap, shampoo, toothbrushes and toothpaste, laundry and dish detergents, Clorox, medical supplies, bedding, seeds, tools and fuel will all be missed! And all my lady friends out there, don't forget to stock up on feminine products OR check out my post on how to deal with Aunt Flow during an emergency.


9. Vitamins are also very important, especially Vitamin C. It is crucial to your immune system.You don't want to get scurvy...even if you aren't a pirate. (May I suggest chewable tablets if you have little kids? You can find them at Walmart, Sams Club and many other places!)


10. If your water has been stored for a long time and goes flat, you can pour it back and fourth between two containers or mix it with a hand beater. It will aerate it again. Or, you can also add flavored drink mixes to your water to make it taste better. If you've used chlorine to purify your water, it will help to mask the swimming pool taste. Unless you like swimming pool water...then you'll be all set!


Hopefully you've found some of these tips helpful in your journey to preparedness!  Thanks for stopping by Prepping With NatSprat!


Friday, January 18, 2013

No Worries. Period.

There is one important aspect to being a prepper that is not very pleasant to think about. And it's been on my mind a lot lately. What if there WAS some sort of collapse...stores were emptied out, money was no good, or for whatever reason, you weren't able to get supplies for a very inconvenient part of a woman's life? What am earth am I talking about? PERIODS. *shudder*


 What would you do? I have been trying to research what women did in the "olden days." How did they deal with this!?! I know the Indians used to send the women to a hut to "suffer" in privacy. I don't plan on doing that. It was actually quite funny to look at some of the old inventions for menstruation.  Let me just say, I am ever so grateful for the advancements of technology!

You know you want one. It won't be obvious at all. And if you don't like it, you can use it as a back up for a bear muzzle or something.


Which brings me to this post. Yes, there are several really great options to help get you through this AWESOME time of the month!

The first thing I thought of, the DIVA CUP. One of my sisters has one and she told me about it. Want to be a Diva? You can learn ALLLL about it HERE.  I bought one. It was about $25...but I figure, what the heck. I pay about $10 every month for my tampons and liners, this can be used for years! So really...it's a good investment. I have to say, I LOVE IT. Basically...you insert it...it catches everything...nothing to throw away...no leaks....it's awesome....the end. I could do an entire post on it, but I'll let you just go to their link and do your own research. I bought mine from Walgreens.com.

Then, I realized that within a few years my daughter will be hitting the wonderful age of Aunt Flow's inconvenient monthly visits, and honestly, the Diva Cup might freak her out. So, I scoured the internet and found some patterns and ideas for things I wanted to try. First, washable maxi pads. (!?!) My initial thought was...."ewwww." But the more I read about them the more intrigued I was. People even claimed that tampons and other store bought pads were actually TOXIC and would cause your periods to be more painful and heavier. Hmmm. Well, it's worth a try!And they actually turned out pretty dang cute. She picked out her own fabric and is excited to use them. (Yes, that's right. She is looking forward to it. Bless her heart.)


Some of them fold up all nice and cute...


And a few of them are just panty liners.  (BTW, they all have a waterproof PUL back or insert so they don't leak!) Also, I used bamboo minky and flannel because bamboo is supposed to be antibacterial. And it is SUPER soft. 


Here are the links to some of the patterns I used. You can adjust how many fill layers you put into them to adjust the levels of absorbancy you want! Also...look into buying some ZORB fabric. It is AWESOME stuff! It holds 5x it's weight in water, so it is super absorbent but not bulky. Nobody wants to wear a diaper, know what I'm saying??? (To those of you who DO enjoy wearing diapers, I apologize. No offense intended.) Anyway, on to the links, which all have great tutorials!


This one is from AskPauline.com 

This one is from NaturalSuburbia.com


And this one is from The Soul Stepford


Alright. So, pads are pretty covered. I will be making a lot more, I'm sure. Look on etsy for diaper cut fabrics! There are TONS of great things to make these with. ORRR, if you don't like to sew, you can find them ALL OVER etsy.com! There are some really, REALLY cute ones out there. Check out these from TrojackFarms!  I secretly want some...they are just adorable. $45 for 6. She has a zillion different kinds...even ones for thong panties. *giggle*


Now...let's talk about ZORB a little more.

1 layer of Zorb is the same as:
---3 layers of flannel
---2.25 layers of French terry
---1.3 layers of cotton fleece
---1 layer of sherpa

To get the same for 2 layers of Zorb, you would need:
---8 layers of flannel
---6 layers of French terry
---5 layers of cotton fleece
---4 layers of sherpa

Which got me thinking. That's some crazy absorbent stuff. And I know...EWWW. But still. If you can make washable pads, can you make washable tampons??? So once again...I researched it. A lot.  Apparently they are pretty common!  You can even buy them on etsy.com! 

 
(!?! Really !?!) 


So...once again...I sat and thought about it for a while. If things were to be bad, what would I do. Personally, I am not a big fan of pads. I have my Diva Cup, which is awesome, but what about people who don't like pads and don't want/have a diva cup? So I researched some more. And I decided to make my own. Drumroll please...


Yes...that's right. I made washable tampons out of Zorb. I haven't used them yet, but still, I have them if I ever need them. I made a bunch. You can also make them into different absorbancies. The one on the top left is a regular/super absorbancy. The top right is a super/super plus absorbancy, and the bottom one just shows how you roll it up and use it like an O.B. tampon. They are supposed to be easy to wash, as well. (Anyone want a tutorial on these??? I can totally do one!)

Quite the adventure, huh! My husband saw me typing this post and said, "Really??? You are going to post that!?!" :) I think he was embarrassed for me. Yes, dear. I am going to post this. Who knows, maybe someone will find it useful...maybe someone is already doing this (and if so I would LOVE to hear how it is going for you) and, heck, maybe someone will even just get a good laugh out of it! 

All I know is that now I can sleep at night, not having to worry about it anymore. Yes...once a month it really stinks being a female. But now, at least I have a solution for it. And now you do, too! :)


Thursday, June 14, 2012

Prepping With Kids {A few helpful tips!}

Do you ever sit and think about what would happen to your family if there really were some sort of emergency? I do. ALL.THE.TIME. Which is why I am making this post. Being prepared with just one person is one thing, but suddenly when you have little kids in the picture it gets a lot more stressful. It's important to know what to do in an emergency, and even more important for YOUR KIDS to know what to do in an emergency, especially if your mind is in crazy panic mode!

Here is a list of tips to help you and your kids be prepared for an emergency! Go over the list with your family and if you aren't already doing these things, maybe you can write them down and plan a special family night together where you can go over these tips.

Here we go! 
  • First of all, include your children in family discussions and planning for emergency safety. ;)
  • Make sure everyone knows where to find your disaster kits or bug out bags.
  • If you live in an earthquake prone area, have a flashlight and a pair of shoes under everyone’s bed in case there is an earthquake during the night. Use a plastic bag tied to the leg of the bed to keep them from moving during an earthquake.
  • Plan where to meet after a disaster if your home becomes unsafe. Choose two places: one just outside your home and one outside your neighborhood in case you are told to evacuate. Be sure your vehicle's gas tank is always at least half full.
  • Determine the best escape routes from your home. Try to identify two escape routes.
  • Choose an emergency out-of-state contact (like an aunt or uncle, close family friend, etc.) and instruct them to call this person and tell him/her where they are. 
  • Make sure each child knows HOW to reach your family’s out-of-state contact person.
  • Locate the gas main and other utilities and make sure family members know when and how to turn them off.
  • Practice your evacuation routes, Drop, Cover & Hold and Stop, Drop & Roll drills.
  • Teach each member of your family how to use a fire extinguisher.
  • Take into account the special needs of your kids, seniors or people with disabilities, family members that don’t speak English and don't forget your pets!
  • Teach your children their basic personal information so they can identify themselves and get help if they become separated from you or their guardian.
  • Prepare an emergency card with information for each child, including their full name, address, phone numbers, parent’s work number and out of state contact(an aunt or uncle, etc).
  • Know the policies of the school or daycare center your children attend. Make plans to have someone pick them up if you are unable to get to them.
  • Regularly update your child’s school with current emergency contact information and persons authorized to pick up your child from school.
  • Make sure each child knows the family’s alternate meeting sites if you are separated in a disaster and cannot return to your home.
  • Teach children to dial their home telephone number and Emergency 9-1-1.
  • Teach children what gas smells like and advise them to tell an adult if they smell gas after an emergency.
  • Warn children never to touch wires on poles or lying on the ground.
  • Role-play with children to help them remain calm in emergencies and to practice basic emergency responses such as evacuation routes, Drop, Cover & Hold and Stop, Drop & Roll.
  • Role-play with children as to what they should do if a parent is suddenly sick or injured.
  • Role-play with children on what to say when calling Emergency 9-1-1.


In your grab and go kit:
  • Include a family picture and a favorite toy, game or book for each child in his/her Go-bag.
  • Include your child’s emergency card and include information on reunification locations and out of area contact.
  • Provide comfort food and treats for each child in your family disaster supplies kit.
  • Keep a recent photo of your children in your Go-bag.
  • Keep extra medications your children are on in your Go-bag.
If you can do these things with your family, I swear you'll sleep better at night knowing that your kids have the tools and skills to be able to handle disaster situations! And, (like I totally need to do now...) every so often, have a refresher course with your family to make sure they remember everything. You'll also be able to update contact lists and your emergency cards.

Thanks for stopping by Prepping With NatSprat! See you again soon! :)

Linked up to:
Tatertots and Jello