Showing posts with label Self Reliance. Show all posts

Wednesday, May 23, 2012

Storing Water 101


Water. Some people call it Blue Gold. And for a good reason! If there were some sort of emergency and water supplies were disrupted, people would trade actual gold for water. Why? Because a person can only live about 3 days without water. Even less, if they are doing strenuous things. Dehydration can kick in very quickly, so it is SO important to have access to water!

Now...guess what today's topic is. Yup, you guessed it! Milk. Hahah. Just kidding.

Water is a super important part of any sort of survival storage. 

In a disaster, water supplies may be cut off or contaminated. A good rule to follow is to store enough water for everyone in your family to last for at least 3 days.
  • Store one gallon of water per person, per day. Three gallons per person per day will give you enough to drink and for limited cooking and personal hygiene. And don't forget to plan for your pets. Fluff-o will get thirsty, too!
If you store tap water:
  • Tap water from a municipal water system can be safely stored without additional treatment.
  • Store water in food grade plastic containers, such as clean 2-liter soft drink bottles. Heavy duty, reusable plastic water containers are also available at sporting goods stores. Empty milk bottles are not recommended because their lids do not seal well and bottles may develop leaks.
  • Label and store in a cool, dark place.
  • Replace water at least once every six months.
If you buy commercially bottled “spring” or “drinking” water:
  • Keep water in its original container, and don’t re-store a bottle once it’s been opened.
  • Store in a cool, dark place.
  • If bottles are not marked with the manufacturer’s expiration date, label with the date and replace bottles at least once per year.
Treating Water after Disaster:
If you run out of stored drinking water, you can strain and treat water from your water heater or the toilet reservoir tank (except if you use toilet tank cleaners). Swimming pool or spa water should not be consumed but you can use it for flushing toilets or washing.

Treatment Process:
Strain any large particles of dirt by pouring the water through layers of paper towels or clean cloth. Next, purify the water one of two ways:
  • Boil – bring to a rolling boil and maintain for 3-5 minutes. After the water cools, pour it back and forth between two clean containers to add oxygen back; this will improve its taste.
  • Disinfect – If the water is clear, add 8 drops (1/8 teaspoon) of bleach per gallon of water. If it is cloudy, add 16 drops (1/4 teaspoon) per gallon. Make sure you are using regular bleach— 5.25% percent sodium hypochlorite— rather than the “ultra” or “color safe” bleaches. Shake or stir, then let stand 30 minutes. A slight chlorine taste and smell is normal.
So, now that you know how to store water, what do you store it in?
There are many ways to store water! We use the big blue storage things  like these:


Or, you can always buy pre-bottled water from the store...these are good if you are going to be traveling around a lot and need something small enough to carry. However, it is more economical to store in a big container, and then just fill your water bottles at home before you go. Those little water bottles can be pricey when you are storing 50 gallons of them! You pay for the plastic.

 Or to be really frugal, you can even save up your 2 litter pop bottles! After you drink all of your pop, Just wash them and fill'em up with water. They are easy to store in random places if space is tight, too. Under beds, sinks, etc. We have them in random places all around our house. How cool is this 2 litter storage!?! Now that is ambitious.


Well, that just about covers it! Hopefully you found this helpful...as for me, suddenly I really feel like I need a nice cold glass of water! Hahah!


Wednesday, May 2, 2012

Dollar Tree 72 Hour Kit Party {Part 1}

Did you see the new button on my sidebar?

SURPRISE!!!


Welcome to my Dollar Tree 72 hour kit party! 

 Being prepared doesn't have to cost a fortune. How would you like to make an entire 72 hour kit with spending only $1 on each item?  (Come on...raise your hand, I know mine is up!)

I found a great link on Youtube that I wanted to share with you! This guy (love his Southern accent...) made an entire 72 hour kit from things he found at Dollar Tree! He spent under $50 on the whole thing! There are a total of 12 videos where he goes over the different items in his pack and reviews them. He has a lot of really good pointers and advice, and is also a doctor so he knows about the medical aspect of a 72 hour kit. I ended up going to Dollar Tree yesterday and getting some more things for my kit that he suggested. Everything he mentioned was there...and I gotta admit, I wish I had seen this before I put together mine! I could have saved some $$$!

So....each day for the next 12 days I am going to post one of the videos for you to watch, as well as a list of items for you to get! 

Today's clip is about what to put your items in. You don't necessarily need a backpack, just a sturdy bag. I started with clip 2 because clip 1 was just saying "Hey guys, I'm going to make a 72 hour kit out of things from Dollar Tree! Let's go!"


 So, you are looking for
 The vinyl utility bags are in the laundry section with the mesh hampers, clothespins, organizing totes, etc. They come in several different colors. The Store It bags are by the paper plates, trash bags and disposable aluminum cookware. If you can't find the ones with the handle, just get the Gallon sized ones! Happy hunting! :)

See you tomorrow for Part 2: Cutting tools (knives, etc.)!

Don't want to miss any of these posts? Be sure to follow me! 

Monday, April 30, 2012

Homemade Granola {Food Storage Recipe!}

I don't know about you, but this whole economy thing has been kinda sorta freaking me out. I've been trying to be a lot more frugal with things, and especially trying to learn how to cook with our food storage basics (wheat, oats, beans, etc.) so I don't have to be trying to learn when things get tough, I'm under a lot of stress and don't know what the heck I'm doing. I also figure that if I learn to cook with what I have in food storage now, my kids won't be all picky about it later.

So, ANYWAYYYYY...I decided to make homemade granola recently. I have to say, it turned out AMAZING! Granola can be really expensive! At Safeway it's around $4 a box. A little box at that. I made about 7 cups of it for around $1. No joke. And it tasted SOOOO much better than the store bought granola with all sorts of random preservatives and who knows what in it! Now, aren't you just dying for the recipe? :)


HEEEERE YOU GO!


Honey Coconut Granola


4 C. rolled oats
1 C. whole wheat flour (you can use white, too...)
3/4 C. honey OR
1 cup maple syrup  (It just gives it more of a maple-ish flavor)
1 C. coconut
1/4 C. cooking oil
2 tsp. vanilla
1/2 C. chopped pecans (optional)


Thoroughly mix together. Spread on a cookie sheet, bake at 300 degrees for 25 minutes stirring occasionally while baking.


You can also add things like sesame seeds, cinnamon, chopped almonds, raisins, etc. but add the raisins AFTER you bake it or it'll be like eating raisin flavored rocks. And we ALL know that eating raisin flavored rocks is no fun.


The best part is that granola is so versatile! It's not just for breakfast. You can put in on parfaits or use it as an ice cream topping! You can even use it as cobbler topping in your dutch ovens. Man, I love this stuff. Oh man. I'm starving. I think I'll go have a snack, and I'll bet you can't guess what it is. :)


ENJOY, my sweet little granola munchers!


Sunday, April 29, 2012

Homemade Maple Syrup


It's Sunday, so I have pancakes on the brain. Every Sunday after church, we have some sort of a lunch usually requiring maple syrup. Waffles...french toast...pancakes...things like that. So we go through A LOT of syrup! Personally, I'm not a big fan of the imitation syrups like Mrs. Buttersworth or Aunt Jemimah. It's mostly high fructose corn syrup and the texture is SUPER sticky and borderline slimy. I like the REAL stuff. The stuff that is so dang expensive that you cringe as your kids drown their pancakes in it. Know what I'm saying? 

A few years ago I found an alternative to the expensive maple syrup (though you wouldn't be able to taste the difference!). It's SOOOOO much cheaper (around 50 cents per filled syrup bottle!!!) and it's way better than pouring flavored high fructose corn syrup all over your french toast. Want to know my secret?

It's this WONDERFUL thing called Mapeline Imitation Maple Flavor. You can find it at most grocery stores or Walmart. It's about $4 and will make 24 pints of maple syrup!


Want to make your own syrup? It's SO easy!

NAT'S MAPLE SYRUP RECIPE

Bring 1 cup of water to a boil
add 1 cup brown sugar
  1 cup regular sugar
1/2 tsp. Mapeline

Stir it until the sugar is dissolved.
That's it!

This stuff is a staple at our house! It tastes SO good and is a great way to save some grocery money... and not have to cringe when your kids pour their own syrup. ;)


Friday, April 27, 2012

Food Storage: Step 1


Food storage. Just the word used to freak me out. Like, "Hey, go build a mountain!" I knew it was something I wanted for my family, but I had NO idea how to obtain it or even where to start! Especially after I got married. We lived in a tiny little apartment above a hair salon with no extra storage space that I could think of. We were struggling newlyweds in college and didn't have a gazillion dollars to spend on food storage like this. HECK...I didn't even know how to cook very well yet!

I'd see a picture like this:


...and immediately my brain would hit panic mode and just switch the channel. 

So, where did I start? With a food storage calculator

All you do is fill in the blanks and it will calculate what you and your family need for food storage for 1 year. 

In our little family we have 3 family members ages 7+, and 2 kids ages 0-6. So, fill in the blanks, click "Calculate"...


and it will calculate what you need.

HOLY FREAKING COW!!! 600 pounds of wheat!?! You have GOT to be kidding me, right? Now we're back to GO BUILD A MOUNTAIN.

Don't switch the channel!!! Don't switch the channel!!! 

Remember, this is only step one. Now, you don't even have to start a full year supply. I didn't. I started out with just building a 3 month supply. It was much more obtainable for me, and it was just nice to know that I had something to fall back on. As our family grew, we were done with college and were on our feet, we started expanding our food storage.

So, if you wanted to start a 6 month food storage supply you would divide the numbers from the calculator by 2. Instead of 600 pounds of wheat you'd need 300. For 3 month food storage supply, you would just take the numbers from the calculator and divide them by 4. So, instead of 600 pounds of flour, you would store 150 pounds. Much easier to chew on, yes?  (And honestly, it doesn't take as long to store it up as you think. Wheat is HEAVY so the pounds add up fast.)

So...this is your first assignment. Click on the link and get your food storage calculator results. 1 year, 6 months, or 3 months, whatever you feel is an attainable goal.Write it down or print it out and keep it where it's accessible. Easy as that!

Ready...set...GO!


Stay tuned for Food Storage: Step 2 and other great emergency preparedness topics and tips!

Thanks for stopping by! 


Wednesday, April 25, 2012

72 hour kit {Bug Out Bag}


This week I've been working on finishing up our 72 hour kits. I call it my bug out bag. Basically, it's a 72 hour kit, which if necessary, can be thrown on and carried if there is some sort of emergency. We live in Colorado, so I have packed this bag according to things I might need in Colorado. If you live in, say, Florida or Hawaii you might pack differently. Also, if you have babies, you'll need to pack accordingly for that: diapers, baby food, etc. However, I think most things I have will apply to pretty much anywhere. So, what do I have in my Bug Out Bag? Let's take a peek, shall we?

First, let's go over some of the basic tools that I have in my bag.

Basics

1. Binoculars so you can see over the river and through the woods, of course...

2. Gerber Multi-tool. Basically...a pocket knife which also folds into pliers and has other "accessories" such as screw drivers, mini saw, various other blades, etc. I made sure it was a good brand, because if my life depended on this knife, I sure as heck wouldn't want it to break on me.

3. A knife sharpener...don't want a dull blade!

4. A compass with magnifying glass (also included with this but not pictured is a Colorado map, so include one from wherever you live!) Um...and know how to read a map. ;)

5. Extra Batteries (for the walkie talkie and flash light)

6. LED Flashlight: I recommend LED flashlights because the bulbs last about 100,000 hours, whereas an incandescent bulb will burn out around 40 hours. LED flashlights are also more rugged and drain batteries 3 to 5 times slower than regular incandescent flashlights. They cost more, but it's worth it. I know I sure as heck don't want my flashlight going out in the middle of the night while trying to find camp. We all know that this is when Bigfoot attacks. *shudder*

7. Walkie talkie. My husband has the other one in his bag, so we will be able to communicate with each other in case we get separated. Make sure you have your stations set right and you know how to use them."Marco!"....."Polo!".....

8. Waterproof/windproof matches

9. Flint firestarter...just in case the matches don't work or I run out.


More camp basics:

1. Roll of toilet paper and Germ-ex wipes: Because...well...when you gotta go, you gotta go.

2. Camp cookware and utensils

3. Folding camp stove

4. Portable cooking fuel (Sterno). So, basically, you unfold the stove, light the fuel, put it in the stove, and cook on top of it. And you don't have to worry about building a fire or anything.

*Here's a link to a folding camp stove with cooking fuel on Amazon.

See? Easy Peasy.


5. Work gloves.

6. Gerber camp axe: because the mini saw in my multi-tool just isn't going to cut it. Literally.

7. Tarp: can be made into a shelter (I'm still searching for a good tube tent that isn't the same thickness of Saran Wrap!!!)

8. Rope: a necessity!

9. Winter hat because as much as 45% of your body heat is lost through your head!

Personal Care Items

1. Mascara. Because even if I'm in the woods, I at least have to have mascara on to feel like a human being.

2. Travel size shampoo, conditioner and lotion.

3. Travel size soap. Because I don't want to stink.

4. Kleenex

5. Body powder: also helps if you are chafing!

6. Diaper wipes: These are for if you need to freshen up and no water is available.

7. Feminine products. Because Mother Nature doesn't care where the heck you are.

8. Chapstick because I would die without it.

9. Bug Spray

10. Sunscreen

11. Travel size deodorant

12. Travel toothbrush and toothpaste.

13. Mini sewing kit. You know one of your kids is going to get their shirt ripped on a tree. It is inevitable.

14. Folding hairbrush/mirror and hair ties.

Keeping Warm and Dry

1. Emergency blankets...I got the more durable kind. Hopefully they will hold up to wiggly little kids better!

2. Hooded poncho: never know when it may rain.

3. Marker, paper and tape: leave notes to help people find you, etc. And duct tape is just flipping awesome and you should ALWAYS have some with you. ;)

4. Trash bags: these are all kinds of useful. Use them as back up ponchos, use them to keep your stuff dry, use them as extra liner to sleep on. You can even use them to collect rain water or make a solar still.

*What's a solar still? It's a great way to collect water in emergencies. Click HERE to learn more!


Drinking Water
*Just because most people can live from 3-5 days without water doesn't mean we should!

1. Actual ready to drink water bottles. Can you believe it!?! Now, remember that a gallon of water weighs about 8 pounds. While water is very important in a survival situation, so is being able to actually stand up and walk.

2. Flavored drink packets just in case I have to use the water purification tablets and the water tastes funky.

3. Water bottle with built in water filter. This water bottle filters out 99.9 % of Giardia Lamblia and Cryptosporidium cysts. VERY IMPORTANT!!! Never drink out of rivers, lakes or streams. Unless you want to be vomiting out of one end and more unpleasant things coming out of the other end.

*want one? Here's a link to them!

4. Water purification tablets: another good thing to always have with you, just in case.

Food

Food seemed to be the most stressful part of packing my Bug Out Bag. Especially because I have 3 little kids. I wanted foods that were portable, had a long shelf life, and actually EDIBLE. I found that there were actually a lot of options for food. Here are a few!

Mountain House Freeze Dried Food

One bag of these runs around $6 and has 2 servings. They last a looong time. If water isn't an issue, these are great. They are super light weight and don't take up a whole lot of space. But if you aren't planning on having much water with you, I'd look at the other options. You have to add 2 cups of boiling water to these pouches. I think these sound pretty yummy!

Another very popular option is MRE's, or Meals Ready to Eat. These have a shelf life of about 5-7 years. (or longer, depending on the temperature they are stored at). I have a Brother-In-Law who was a Marine, and he said that these are actually pretty good. These run about $2.50 each, and each meal is 1 serving. You don't have to add water, just heat up the pouch, open it up and chow down. There are lots of different meals to chose from, as well as snacks, side dishes, and desserts! I got mine from
BePrepared.com
(I seriously love that place.)

Another option is just finding things at your local grocery store! This is an example of breakfast: Instant oatmeal, cereal bars, and hot chocolate. I got all of these things from Walmart! Keep an eye on the expiration dates, though.

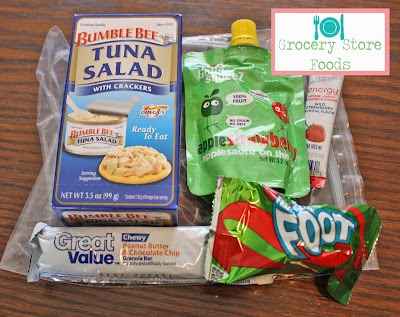
These are more grocery store foods. (One of my lunches, to be exact!)
Tuna salad with crackers, granola bar, applesauce, fruit snack, and a crystal light energy water pack.

These Compleats are good, too! The shelf life is about a year, and they have lots of really yummy flavors! I'm planning on just dumping mine into my cookware and heating it up. I can only imagine how wonderful this would taste after a long day of surviving in the woods. :)

This is one of Kate's lunches. Mac & Cheese, applesauce and fruit snacks. Things I know she'll actually eat! And again, no water needed, and the Chef Boyardee things have a pretty good shelf life.


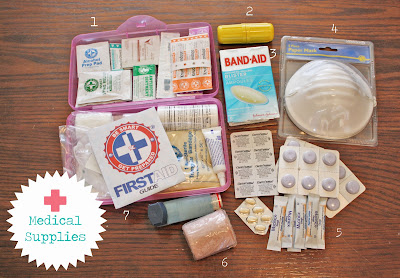
Medical Supplies

1. General First Aid Kit:
* Band-aids of various sizes
* antibiotic ointment
* thermometer
* triangular bandage
* eye rinse
*antiseptic wipes
*Calamine lotion (anti itch cream)
* medical tape
* Sterile gauze bandages various sizes
*Sterile gauze wrap
* acetaminophen and ibuprofen
*antacid tabs
* non-latex gloves (2 pairs)
* burn cream
*tweezers
*scissors

2. Snake bite kit (sure hope we don't have to use it...)

3. Blister Care Band-aids

4. Masks

5. Various commonly used OTC medicines at our house: children's Tylenol, Mucinex packets, my Zoloft (yes...I need my happy pills!) and Whitney's inhaler. Ohhh...it would be such a bad thing if we didn't have it with us!

6. ACE elastic bandage

7. First Aid Guide: In case I freak out and can't remember how to put on a Band-aid.

A few other things to put in your bag (I didn't take pictures of these...sorry!)

*an extra change of clothing
*important documents
*cash!!!
*a portable handheld radio (the kind you can wind up by hand)
*folding camp shovel
* fun things for the kids: coloring books, card games, etc.
*scriptures and journal


Annnnnd, that just about covers it! Can you believe that all of those things are crammed into that backpack? ROCK ON. If I forget anything or add things I'll update as I go. Also, my kids each have their own Bug Out Bags, and they just carry the very basics. Otherwise, they would fall over and cry and we would never get anywhere. The end.

If you have any questions or suggestions, leave a comment and let me know! Hopefully you found this helpful. You don't have to get everything all at once, just little by little! I made a goal to get at least ONE thing for my pack every time I went to the store. Baby steps, my friends, baby steps. Baby steps to Walmart....baby steps to the back pack isle....baby steps to the camping section....hahah. :)


Linked up to: